
|
|
|
|
Most dryer thermostats are fairly simple devices whose operation is easily understood. They are often referred to as "thermodiscs" after a popular manufacturer of them In their simplest, two wire form, a dryer thermostat can be though of as a simple SPST (single pole, single throw) switch similar to a standard house light switch. The main difference being that instead of needing you to flip the switch there is a heat activated bimetal that performs that action automatically. 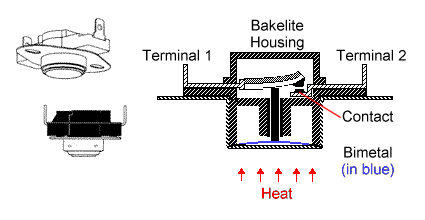 Dryer Thermostat Operation When the bimetal inside the thermodisc is subjected to a set, designed temperature, it warps. This warping pushes on an actuator which in turn opens electrical contacts inside the device. The electrical circuit that it is part of will open thus shutting off power to whatever component is in the circuit like a heater element. Once the thermostat has had a chance to cool, the bimetal returns to it original shape allowing the electrical contacts to close again and resume the electrical connection once more. Dryer thermostats are rated in degrees Fahrenheit which will be marked on the thermostat somewhere. This temperature will be identified by an "L" followed by the temperature rating. Eg. L130, L145, L155, etc. This is the temperature the normally closed contacts will open at. At room temperature, the main contacts will be closed and should show continuity when tested out of the circuit, if good. Once opened by heat the contacts will remain open until it has cooled to a set temperature which will be dependant on the calibration it was designed to. This differential may also be displayed on the part and could be 10-40° or more. If displayed on the part, it would look something like L150-20, the 20 being the differential between cut out and cut in. There will be at least 2 thermodiscs on a conventional dryer, a cycling thermostat that controls the drying temperature and a safety thermostat usually mounted on the heater housing. Some models may have up to five, one for each of the different temperature selections available plus the safety thermostat. 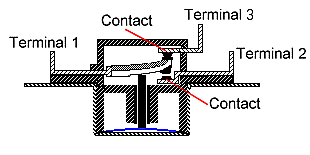 3 Terminal Thermostat Cut-away View Some dryer thermostats are of the SPDT (single pole, double throw) design and can usually be identified by a third wire terminal (usually smaller) mounted towards the top of the thermostat housing (see illustration above). On this design when one set of contacts opens, another set closes. This second contact is often used to provide power to the allow the timer to advance when in a permanent press or automatic mode.
These multi-terminal thermostats work similar to either the 2 or 3 terminal models described above but have an added internal heater, hence the blobs of solder used to connect it to the terminals. This heater is energized on some cycles to bias or change the actual operating temperature sensed by the thermostat. This can allow a single thermostat to cycle at different temperatures depending on whether the internal heater is energized at the time or not.
Some dryer models use a SPDT thermostat to control the advancing of the timer in the 'auto' or 'permanent press' cycle as described above. Others (older Whirlpool built models especially but also some newer Frigidaire and GE dryers) have a resister in series with the timer's motor which only allows power to flow to that motor when the heater is cycled off by the control thermostat. On the latter design should this resister fail, it will stop the timer from advancing in the auto dry mode but will still advance normally on regular timed cycles.
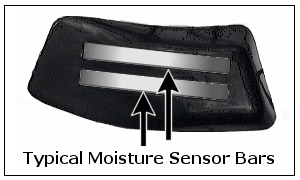
Still other dryer models (many newer ones) use a "moisture sensor" to control advancing of the timer during an 'automatic' or 'permanent press' dryer cycle instead of using one of the thermostats or a separate resister. A moisture sensor is a much better way of determining actual dryness of clothing. Its circuit usually consists of an electronic control and electrodes (see illustrations below) at either front or rear inside the dryer drum area which actually come into direct contact with the clothing being dried.
Some such moisture sensor's electronic controls utilize a run capacitor in the circuit to the timer's motor. When the dryer is running in the 'auto-dry' mode wet clothes complete a connection between two or more moisture sensor electrodes. When this connection is made it closes an electrical circuit which in turn causes the control board's capacitor to be discharged. With the capacitor discharged, the timer motor will not advance. When the clothes are nearly dry, they fail to complete the connection between the electrodes which allows the timer motor to run until the end of the cycle. One common cause of this feature's failure is simply a build-up on the electrodes' surface which prevents the electronic control from determining the true 'wetness' of the clothing. That in turn causes the dyer to shut off before the clothes have fully dried. This build-up may be just lint or residue from fabric softener sheets. It may be possible to temporarily short the sensors and test for power at the timer motor to see if the circuit board portion of the circuit is functioning or not. While shorted, no power should be found at the timer's motor.
Other times the sensor electrodes can prematurely short together causing the dryer's control to 'think' the clothes are always wet, never allowing the timer to advance to the OFF position. On one common sensor design (seen directly above), coins can become trapped behind the sensor housing causing a short in the sensor circuit. Under such a condition, the short 'fools' the control into thinking the clothing is still wet and prevents the timer from advancing to the end of cycle.
The most common causes of these devices opening are a plugged, partially plugged, too long or improperly installed dryer vent but poor drum seals or a malfunctioning blower can also result in the opening of a thermal fuse. In most cases poor air flow through the dryer is the cause although a heater element shorted (touching) to ground (other metal surfaces) can cause the heater to remain on and trip the safety when the motor and fan stops turning. Each manufacturer uses a different design of safety fuse and some have even used several different styles on their products over the years. Some dryer models may have as many as two thermal safety fuses. You should get the proper replacement for your model and never, ever attempt to bypass it. It is a safety device that if open is a warning to you that there is a problem that needs swift attention.
If a thermal fuse repeatedly blows even after the proper functioning of the dryer is confirmed and its venting is cleaned and reevaluated (see Related Links below), there may be a problem with the dryer's lint filter. The use of softener sheets like Bounce can leave a residue on the dryer filter that prevents proper air flow through it. The following video explains how to ensure it is not the cause.
This page may contain affiliate links. |
![]()
Appliance411 Home
The Purchase |
Home Service |
Repair Parts |
Q&A Forum |
Appliance Links
News |
FTC Disclosure |
Contact Us |
Privacy
Support Appliance411 |
Much2.com
Copyright © Daniel O'Neill 1997-2026. All rights reserved.


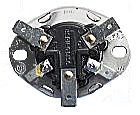 There are also various multi-terminal thermostats in use on some dryers. These can usually be identified by the extra smaller terminals mounted flat rather than on top of the housing. They can also frequently be distinguished by the little blobs of solder found at the base of one or more of these extra terminals.
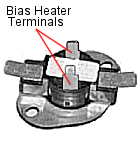 More modern dryers may use a SPST (single pole, single throw) thermostat for temperature control which may also contain a bias heater. On these, two terminals for the bias heater connection appears at the top of the thermostat housing and only perform that one function when powered of changing the temperature at which the thermostat operates.
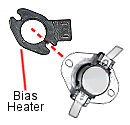 Other modern dryer designs may use a separate bias heater in conjunction with either a SPST or SPDT thermostat. Using this design the thermostat is mounted directly on top of the heater allowing each to be replaced separately when defective.
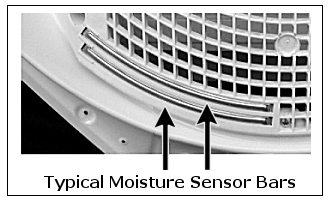
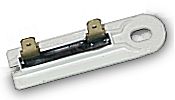 Many dryers today also have safety thermal fuses to protect against fire. These are non-resettable and once open have to be replaced. If one of these should fail on your dryer, it is usually a sign of a problem that should be corrected.