|
There have been numerous oven control systems used over the years. The following instructions describe various methods that might be employed to correct such a condition.
In almost all cases if the temperature reading is more than 35°F out, some part of the control system will need to be repaired. Usually adjustment will not provide an adequate solution to the condition and may even make it worse.
Before attempting any kind of adjustment on a hydraulic oven control, make sure the thermostat's sensor bulb is properly mounted in the oven cavity and not touching the oven wall or metal rack. The sensor bulbs are held about 1/2" away from the oven wall by a small metal clip.
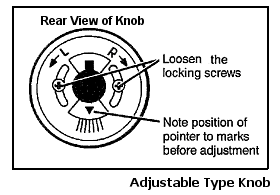
Dial type control
Some models have the calibration adjustment on the underside of the knob itself. On this type of arrangement, the loosening of the dial plate and moving it one way or the other will change the temperature reading on the dial once reinstalled.
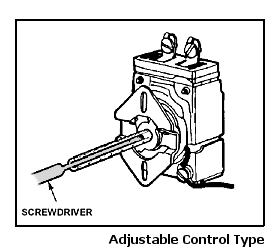
Other control designs have the temperature calibration screw down the center of the shaft. These usually require a special small screwdriver to access it. See below for a link to a detailed calibration method for one brand of oven thermostat.
Electronic Control Calibration
The following procedures are designed to provide an general idea how calibration adjustment of the oven temperature display on many electronically controlled (ERC/EOC) ranges and ovens is done. The actual procedures vary from model to model so check your owner's manual.
If the temperature is out more than 35°F, the oven sensor or the electronic control may need to be replaced to correct the inaccuracy.
General
- Press BAKE
- Select a temperature of 550
- Quickly (within 5-seconds of setting 550) press and hold the BAKE button approximately 5-15‡ seconds until "00" or the previously entered temperature adjustment is displayed.
‡Pressing longer could cause an F0, F1 or F7 error to be displayed.
- Press the UP/DOWN arrow button or turn the set knob to change the oven temperature in 5° increments to a maximum of +/- 35°
- Press the CLEAR or OFF button to return to normal operation.
Exceptions
For Frigidaire built "Trimline Easy-Set 1" dial type E.O.C.
- With the Oven Control Dial set to OFF, press and hold the START pad for 30 seconds, (until a single "beep" is heard).
- Within 5 seconds, turn the oven control dial to either the BROIL HI, to increase, or BROIL LO, to decrease the oven temperature. Maximum adjustment will be 35°F up or down from the factory pre-set point.
- The oven temperature can now be adjusted up or down, in 5°F increments, by pressing the START pad. Adjust until the desired amount of offset is reach. This offset will be indicated by a flashing L.E.D.
A flashing "OVEN" L.E.D. indicates a positive offset. A flashing "LOCK" L.E.D. indicates a negative offset. They will flash once for each 5°F of offset it has been programmed for. After the flashing sequence, it will pause and then repeat the sequence.
Example: If the "OVEN" L.E.D. flashes three times and then a pause, the offset is +15°F.
If no "OVEN" or "LOCK" L.E.D. is flashing, the E.O.C. has the original factory preset.
For some General Electric ranges
- Press the BAKE and BROIL HI/LO pads at the same time for 3 seconds until the display shows SF.
- Press the BAKE pad. A two digit number shows in the display. The oven temperature can be adjusted up to +/- 35°F.
- Press the INCREASE pad to increase and the DECREASE pad to decrease the temperature in 1 degree increments.
- When you have made the adjustment, press the START pad to go back to the time of day display.
The above procedure will not affect the broil or clean temperatures.
Some GE models with temp. knob to the right of display
- Press and hold the two hour arrow buttons for 5 sec.
- Then use the arrows buttons to adjust temperature up or down.
Other GE models with temp. knob to the right of display
- Turn the temperature knob to the OFF position.
- Press and hold the HOUR +/- button for 5 seconds until the display changes.
- Before display changes back, press the HOUR +/- button again to increase or decrease the temperature in 5 degree increments.
If the oven adjustment is set cooler than the factory setting, a minus sign (-) and the offset temperature will appear in the display.
- Wait several seconds for the control to automatically set and return to its previous setting.
Some GE models between 1980 - 1993
- Set bake to over 500
- Press and hold the bake button (~5 sec.) until display changes.
- Then use the knob or up/down arrows buttons to adjust temperature.
For some Whirlpool/KitchenAid/Kenmore ranges and ovens
- Press BAKE button for 5 seconds. The default or a previously entered temperature offset will show.
- Press the TEMP 'up' arrow to increase the temperature in 10°F or 5°C increments*.
- Press the TEMP 'down' arrow to decrease the temperature in 10°F or 5°C increments*.
- Press START to save the temp. adjustment.
*A maximum offset adjustment of ±30°F or ±15°C is possible.
(To switch between Fahrenheit to Celsius, try pressing and holding the "broil" button for 5 seconds.)
| 


