Safety & Tips
Get help bringing the unit into the house
Unplug the unit
Shut off water
Remove shipping bolts!
Carefully level washer
Check for leaks
|
Time Required: 2 hrs.
Level of difficulty

|
Required Tools
Adjustable (solipsist) pliers
Pipe wrench (only if hoses will not come loose)
|
|
Installing a Washing Machine
Time for a new washing machine? Make sure that you select one that is appropriate for your needs. 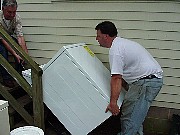 A family of five likely needs a larger model than does a single person. Washing machines come in many different configurations and an array of features.
Installing a new machine is fairly easy as most units do not require special wiring, unlike an electric dryer. Remember, these instruction are fairly generic, check the information that comes with your unit.
 Step 1:
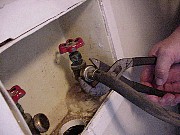
The first step is to unplug the power, shut off the water to the old unit and remove the hoses. There are normally shut valves directly behind the unit. Shut these off and then remove the hoses from the taps. First try to remove the hoses with your hand, if that fails go to adjustable pliers. If all else fails, use a pipe wrench but be careful! a pipe wrench exerts a tremendous amount of force and may damage the fittings.
Step 2:
Once the hoses are loose, remove the drain hose from the basin or standpipe (these normally just slide in) and then remove the old washing machine. The machine and drain hose may still contain some water. If you place the drain hose by a floor drain or into a bucket, you can allow any access water to drain out. You'll appreciate the lesser weight and mess, when removing the old machine.
Step 3:
Before bringing the new machine in, clean up and inspect the floor under the old unit. Unstable flooring can lead to extensive internal suspension damage to the new washer. If necessary, strengthen the flooring with added joist bracing or an additional plywood sheet.
Bring the new unit in and slide it into the approximate position you want. Carefully read the installation instructions to find the shipping braces that need to be removed (varies by brand). ** Using a washing machine before the shipping braces have been removed can seriously damage the appliance. **
 Step 4:
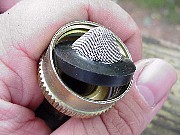
 Install fill hoses onto the machine and the drain hose using the hardware provided. It is important to note here that NEW fill hoses should be used to minimize the chance of bursting due to age. Most new machines come with new hoses and hose washers but braided stainless steel lines are available separately if you prefer.
Step 5:
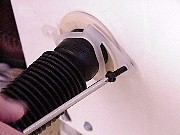
Once you have moved the new washer into place, hook the hoses up to the water taps. Place the end of the drain hose in the standpipe or over the edge of the basin and secure them in place. In the case of a standpipe, do NOT seal it tight, an air gap must be left between the washer's drain hose and pipe to avoid a siphoning effect. You can not usually drain the unit directly into a floor drain either (see the link below). Then plug in the machine.
 Step 6:
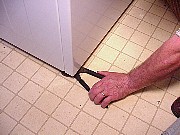
Using the adjustable feet on the washing machine, level the unit up. Most often you can use adjustable pliers to turn the feet to get the machine level. One trick here is to use a pry bar to lift the corner to help avoid gouging the flooring. Next, plug in and run the machine through a cycle and check for leaks.

|
Our thanks to InsideSpaces for the use of this article. Please visit their site at www.InsideSpaces.org for more great home improvement resources
Please note: InsideSpaces considers all of the information to be reliable. They strive to provide the best home improvement and repair content possible, but assume no liability for the information contained herein. [Full Disclaimer]
|
~ Edited for content ~
Disclaimer: The staff of Appliance411 does not necessarily agree with the opinions expressed in this article. This information is presented for reference only.


